Wednesday, October 14, 2009

Peaches and Pâte Brisée


Alas, it's the time of year that I've been dreading. Today was the first official day of rain in SoCal. Summer is almost out the door, it's time to say my goodbyes to the gorgeous sunny days. I'll be slaving away over papers, presentations, and exhibition plans this winter. -sigh-

Food blogs all over the web have began posting winter recipes with pumpkin and cranberries. Soups, stews, and warm cobblers are popping up everywhere. I'm having a hard time saying my goodbyes to summer even though I'm craving the goodness of Thanksgiving.

I haven't started baking fall goodies yet, so here's a post about peaches and crusts; or the last bit of summer. My mom bought these peaches from the grocery store, so they were kind of hit or miss. After having organic, locally grown peaches, these just didn't compare! If you can, always try to get your hands on good locally grown peaches instead of what the market usually carries. Go to your Farmer's Markets people!! The produce is waaaay better...even if it might cost a little bit more, it's definitely worth it.


I decided to make both a galette and hand pies. I tried two different crust recipes. The galette was adapted from Smitten Kitchen's Nectarine Galette. I don't know if it was because of this recipe or me learning to handle dough better, but this was one of the flakiest crusts I have ever made. It was beautiful!! And really simple: flour, sugar, salt, butter, water. The filling consisted of peaches, ground almonds, flour, and sugar. The sprinkling off granulated sugar before baking made a beautiful crust. I would probably cut the sugar out of the dough recipe next time though, there was plenty of sugar to be had in the filling and the final sprinkling.


The second crust recipe consisted of the same ingredients, minus the sugar. But it was put together in a whole different way from Tartine, that I found through Croissants for Breakfast. The method goes somewhere along the lines of rolling out all the ingredients on a flat surface. At first it seems like a rather strange, messy idea, but the crust came out pretty flaky, just not the same kind of flakiness as the galette. I also decided to sprinkle these with some turbinado sugar, which didn't do much to the appearance, I should have used a better glaze and perhaps regular granulated sugar.

Saturday, September 19, 2009

I Scream, You Scream, We All Scream for CAKE, MADELEINES, AND "PIES"!!


Wow, it's actually been a month since the last time I wrote! There's just been so much stuff going on! Moving in to a room I'm renting out for school, actually going to school, and doing homework and what not. My oh my, it's been hectic. And grad school is definitely INTENSE! It's almost kind of ridiculous how much Art History I'm thinking about these days...well IT IS the only thing I'm learning about right now. The first few weeks of school haven't been too bad, I haven't gotten terribly lost and I'm learning to deal with the mass amounts of reading I have to do plus presentations (which I hate btw). The only things I haven't gotten over yet is how much older my peers are and that I feel like a college freshman again!! UGH!

Anywho, let's talk cake! Who doesn't love a gorgeous moist two-layer chocolate cake with fluffs of shiny 7-minute frosting and cute little sprinkles? I dare you to resist! I made this cake as a birthday present for my friend who turned 23 a few weeks back. I've actually known Hasel for about 9 years now and I've never made her a cake! Kind of ridiculous isn't it? I got the recipe from awesome possum Deb at Smitten Kitchen who just had a baby boy! This cake has got the goods! Intense chocolate flavor from the chocolate, cocoa powder, and coffee. However, the only problem I had was with the frosting. It seemed like the recipe was just barely enough to frost the cake and to put some between the layers. Which leads me to the bigger problem, I'm not sure if it was too hot that day or something, but all the frosting I put in between the layers managed to get pushed out to the sides. You can't really tell in this picture, but once the cake was cut it just looked like one big fat piece of chocolate cake with no frosting in between!! I was kind of sad, but the taste made up for it.


I made these mini cupcakes with the same recipe, except subbing honey
for corn syrup in the frosting because I had none left.

Even though I've been busy the past month, I've also been busy baking and trying out random recipes. I tried making some lemon glazed madeleines since I finally got a tray! They didn't come out too great the first time I made them though...recipe via David Lebovitz


I'm pretty sure I over mixed the batter...they were pretty dry :(


I tried making them again with a different recipe from 101 Cookbooks these came out WONDERFUL, so wonderful I don't have any pictures...maybe next time!

Yesterday I tried making Pan Dulce or actually Conchas from a recipe on Joy the Baker. I probably should have waited to have the proper ingredients when I made these, but I couldn't help it, I was craving some sweet bread! I ran out of unsalted butter and shortening when I made these so I substituted with salted butter and margarine...boy was that a big mistake!! The salted butter and margarine went into the topping, to this, flour and powdered sugar are added. I knew salted butter was going to be pretty salty for something that's supposed to have a sweet topping, but I just thought to myself, what the heck? Let's just add more sugar than what the recipe calls for to cut the saltiness away. Really bad move on my part because the bread came out beautifully and tasted wonderful! So let's go with some cute before-they-went-into-the-oven-and-came-out-horribly-shots.

Topped with chocolate and cinnamon sugar paste.


The plain one, and yes, the design is supposed to resemble a shell :)

I should have noticed the signs that they were going to come out wrong when the topping started sliding off as the bread was doing it's last rising. I tried to fix it as much as I could, but they just ended up coming off anyways in the oven. So are you ready for it?


They look a bit sad, but they still tasted great...except for the topping (on the first day). The topping was really crunchy, instead of being soft, probably because of all the extra sugar, no shortening, and maybe because the topping was too thick? I kept these sealed in plastic bags over night and to my surprise this morning, the topping had softened, closer to resembling the kind you get at Vallarta or other Mexican markets.

And last but not least...I know you've heard of Luxirare's lollipop-pies , the first time I saw them I was amazed, and kind of wondering why no one thought about it before. Then I came up with an idea...my mom has been making what I like to call Pineapple Pinwheels for as long as I could remember. They have a fond place in my childhood. These pinwheels are kind of like pies, they're made with a flaky pie crust that enclose a fruity pineapple filling. I know some of you might be wondering if you've ever had a pineapple pie before, if you haven't it's totally A-OK. These pineapple pies are more of a Thai thing. In Thailand you'll find different incarnations of these. Some have the pineapple filling in between two crackers or cookies in varying shapes and sizes.


Aren't they adorable?

The "pie" filling isn't like the traditional apple, cherry, or blueberry. Crushed pineapple is drained of it's juices and then it's gently cooked with plenty of sugar until it gets brown and sticky...almost like a pineapple jam? But it's much more dry. The pie crust is made with shortening to ensure it's flakiness. The dough is rolled out pretty thin, possibly about 1/8 of an inch. 1 3/4 in. squares are cut along the dough along with 4 cuts at the corners of each square so the pinwheel can take shape. The filling is rolled into small balls and placed in the middle of each square. An end from each of the 4 cuts is pulled to the top of the pineapple ball. And then it bakes. I put toothpicks in them after just so they could look more like the pinwheels of our childhood. If anyone is interested in the recipe, just let me know and I could get it from my mom.

Hopefully I'll be able to update more that once a month, but we'll see how much work I'll be buried in. And if you're free tomorrow and you're in L.A., the 17th Annual Thai Cultural Day is going to be held at Barnsdall Park on Hollywood Blvd. Go have some Thai food, check out Thai traditional dress, Thai entertainment, and the Hollyhock House for all you Frank Lloyd Wright fans! Admission is free and starts at 11am til 5pm.


Wednesday, August 19, 2009

Carbs Galore


Hey there cupcake!

Wow, today has been a really INTERESTING day. I was watching the Kathie Lee & Hoda morning show and they were talking about Michelle Obama's shorts. WTF?! And then my boyfriend shared this article with me about Archie Comics...he proposed to Veronica?! I was so confused!! But then again, just because he proposed to Veronica doesn't mean he's going to marry her right? Archie and Betty are supposed to be together!! Or at least that's what I thought when I was reading these comics years ago. Okay, so enough with my ranting and denial, let's get down to business!

See that cupcake up there, the cute little red one with a swirl of frosting on top? It's a Vanilla Buttermilk Cake with Brown Sugar Cream Cheese Frosting. I got the recipe from Joy the Baker's blog. I made it as a wedding cake sample for my sister, yes, the one I decided to make the wedding cake for. The cake was pretty good, light and tender, but maybe I could have gone without the color. The frosting on the other hand was a little too buttery, most likely because I ran out of powdered sugar. So I'll need to give that another try some time. This cake recipe is definitely going on my list of possible cake recipes for a wedding cake.

So you're reading the title of this post and you're wondering where all the carb is right? Well here it is, I introduce you to Alton Brown's Soft Pretzel's.


I'm not too big of a fan of the salted pretzel.

What is there to say? Alton Brown is a genius. They looked beautifully dark and they tasted pretty good, but maybe a little too baking soda-y, since there was 2/3 cup for 10 cups of water. Would lowering the baking soda not give me that great of a color? Or was the color just all from the egg wash? Anywho...I would definitely recommend this pretzel recipe to anyone who's looking for one. It's pretty simple, but shaping them is another story, I need more practice with that. Ready for the next round of carbs?


Croissants et un pain au chocolat.

I don't know why I decided to make these yesterday. I guess I've been intrigued by them, like the macarons, I just needed to try making it so I can say that I know how. All I have to say is CROISSANTS. Delicate, flaky, fluffy, crisp, buttery, and light. These can't really be made in a hurry, most of the recipes I came across require letting the dough rest from 4 to 18 hours. So please be patient when you make these, you'll be completely satisfied with the effort it took to make them when you taste a fresh, hot, croissant. I got the recipe here, it's quite long I'll copy it here, I read it over about 3 times for it to make sense. I started this yesterday and finished it before noon today.

Classic French Croissants

adapted from Epicurious and the District Domestic

1 1/2 cups whole milk, heated to warm (105°F–110°F)
1/4 cup packed light brown sugar
1 tbsp plus 1/4 tsp active dry yeast
3 3/4 to 4 1/2 cups unbleached all-purpose flour
1 tablespoon kosher salt
3 sticks (1 1/2 cups) really cold unsalted butter

This was after I made the dough, wrapped it, and chilled it.
Crazy yeast-y air bubble action going on!

Start by making the dough: Stir together warm milk, brown sugar, and yeast in bowl of standing mixer and let stand until foamy, about 5 minutes. (If it doesn’t foam, discard and start over – the yeast was dead.) Add 3 3/4 cups flour and salt and mix with dough hook at low speed until dough is smooth and very soft, about 7-9 minutes.

Transfer dough to a work surface and knead by hand 2 minutes, adding more flour as necessary, a little at a time, to make a soft, slightly sticky dough. Form dough into a roughly 1 1/2-inch-thick rectangle and chill, wrapped in plastic wrap, until cold, about 1 hour.

I drew the 8x5 rectangle on the wax paper I used just to make it a little easier.

Prepare and shape butter: After dough has chilled, arrange sticks of butter horizontally, their sides touching, on a work surface. Pound butter with a rolling pin to soften slightly (butter should be malleable but still cold). Scrape butter into a block and put on a kitchen towel (flour sack towels work best), then cover with other towel. Pound and roll out on both sides until butter forms a uniform 8- by 5-inch rectangle. Chill, wrapped in towels, while rolling out dough. (Don’t skimp on the chilling – it’s important to not let the butter “melt”)

Buttery goodness waiting to be transformed.

Roll out dough: Unwrap dough and roll out on a lightly floured surface, dusting with flour as necessary and lifting and stretching dough (especially in corners), into a 16- by 10-inch rectangle. Arrange dough with a short side nearest you. Put butter in center of dough so that long sides of butter are parallel to short sides of dough. Fold as you would a letter: bottom third of dough over butter, then top third down over dough. Brush off excess flour with pastry brush.

Roll out dough: Turn dough so a short side is nearest you, then flatten dough slightly by pressing down horizontally with rolling pin across dough at regular intervals, making uniform impressions. Roll out dough into a 15- by 10-inch rectangle, rolling just to but not over ends.

Brush off any excess flour. Fold in thirds like a letter, as above, stretching corners to square off dough, forming a 10- by 5-inch rectangle. (You have completed the first “fold.”) Chill, wrapped in plastic wrap, 1 hour.

It looks like this for a while, when you're rolling and folding over and over again.

Make remaining “folds”: Make 3 more folds in same manner, chilling dough 1 hour after each fold, for a total of 4 folds. (If any butter oozes out while rolling, sprinkle with flour to prevent sticking.) Wrap dough tightly in plastic wrap and chill at least 8 hours but no more than 18 (after 18 hours, dough may not rise sufficiently when baked).
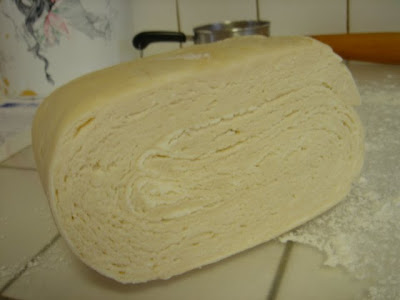
Check out those layers of dough and butter. This is for the final rolling out.

Roll out and cut dough: Cut dough in half and chill 1 half, wrapped in plastic wrap. Roll out other half on a lightly floured surface, dusting with flour as necessary and stretching corners to maintain shape, into a 16- by 12-inch rectangle. Brush off excess flour with pastry brush and trim edges with a pizza wheel or sharp knife.

Arrange dough with a short side nearest you. Cut in half horizontally and chill 1 half. Cut remaining half vertically into thirds, forming 3 rectangles. Cut each rectangle diagonally in half to make 2 triangles, for a total of 6 triangles.

Shape croissants: Holding short side (side opposite tip) of 1 triangle in one hand, stretch dough, tugging and sliding with other hand toward tip to elongate by about 50 percent.

Return to work surface with short side of triangle nearest you. Beginning with short side, roll up triangle toward tip. (Croissant should overlap 3 times, with tip sticking out from underneath; you may need to stretch dough while rolling.)

Put croissant, tip side down, on a parchment-lined large baking sheet. (Curve ends inward to make a crescent shape if desired.)

Make more croissants with remaining 5 triangles, then with remaining rolled-out dough, arranging them 2 inches apart on baking sheet. Repeat rolling, cutting, and shaping procedures with chilled piece of dough.

Let croissants rise: Slide each baking sheet into a garbage bag, propping up top of bag with inverted glasses to keep it from touching croissants, and tuck open end under baking sheet.

Let croissants rise until slightly puffy and spongy to the touch, 2 to 2 1/2 hours.

Rising in the oven, instead of a garbage bag with glasses...

Bake croissants: Adjust oven racks to upper and lower thirds of oven and preheat to 425°F.

Remove baking sheets from bags. Spritz inside oven generously with spray bottle and close door. Put croissants in oven, then spritz again before closing door. Reduce temperature to 400°F and bake 10 minutes without opening door.

Switch position of sheets in oven and rotate sheets 180°, then reduce temperature to 375°F and bake until croissants are deep golden, about 10 minutes more.

My camera sucks...I don't think this captures the glory of fresh croissants.

You know you want some!

I really hope you guys try this sometime! There is no way you would regret it. It might take a few diagrams and lots of waiting, but it is SOOOO worth it! Have fun and enjoy!


I really don't know when I'll be making these again though ;)


Monday, August 10, 2009

Eating Vegas and Other News

A bag full of goodies!

Wow, it's actually been quite a while since my last post...Well I was basically computer-less last week because of a Vegas trip I took with my boyfriend and another couple. It was a pretty awesome trip since I haven't been there for about 8 years?

We got into Vegas in the evening last Monday, we checked in at Tahiti Village, and took a dip in the really awesome lazy river! We decided to go out for food a little after 9:30, first we though we'd check out the restaurant at the place called Tahiti Joe's. But apparently they were closing at 10, so we didn't get in. Tummies grumbling we decided to hit the Strip, of course being the foodie that I am I did plenty of research for which restaurants I we should check out. We were craving burgers so we went to the Burger Bar at Mandalay Bay. Sorry about the blurry pictures! It was kind of dim in there and I didn't want to take a picture with flash because I didn't want people to stare..haha..So here is what me and the bf ordered.


Some kind of burger my bf created with Kobe beef
and a side of sweet potato fries.


I got the sliders that were kind of like samplers of their
larger burgers with a side of skinny fries.


The Verdict: The sliders were so cuuuuute, but they were um..... blah, I don't think I'd order them again. The fries were really good when they came out hot, but after a few minutes, they were cold and hard. Maybe I didn't eat them fast enough? The buns for the sliders were not enjoyable, they seemed stale, or just too hard for a hamburger bun. However, the beef was cooked to a perfect medium rare. I wish I ordered a full size burger, just because I had a bite of my bf's. The bun was waaaay different and it was pretty good. Sweet potato fries were awesome too! I forgot what kind of sauce that was on the side though...but I know it was good.

I was dying to visit a Vegas buffet before the trip, but I don't think we were hungry enough for it on Tuesday. So instead for lunch we went to Earl of Sandwich at Planet Hollywood. And I couldn't have been more satisfied. And I knoooow, I probably should have taken a picture of the sandwich without the wrapper. Haha..but I was too excited to try the gorgeous looking sandwich.


Possibly the World's Greatest Hot Sandwich!

The Verdict: Despite the fact that I first ordered a BLT, which the cashier told me they ran out of, I had to make a quick decision because the line was growing pretty fast, I got the Earl's Club..and WOW was all I had to say when I took that first bite. I couldn't be happier that they ran out of BLT's. The bread was amazingly thick, yet soft, the combination of Roasted Turkey, Smoked Bacon, Swiss Cheese, Lettuce, Roma Tomato & Sandwich Sauce was perfect. But I was kind of confused though, the sandwich I had had all the components to make a BLT, so what was the deal? Do they make these sandwiches ahead of time and keep them under a lamp? I mean that would explain the really cool looking gold wrapper that also retains heat well. Ehh, the sandwich was still good but I just want to knooooooow! Oh yes, I also got some lightly salted kettle chips that were nothing too special, but always good with a sandwich. Definitely one of the best stops for great food at a great price on the Strip. I think the sandwiches are about $6 or $7.

Hmmm..I'm having a hard time remembering what we had for dinner that night. What I do remember is that we went to Chipotle one night for dinner, I just don't remember when that was! And I don't have any pictures of any dinners. So let's skip the day by day game play.

We went to The Wynn for lunch at The Buffet one of those days. I was pretty impressed with all the choices and the flavors. This buffet was no Sizzlers!


A tiny sample of what was offered for lunch.


Some desserts!

The Verdict: Choices were plentiful indeed! Possibly enough to please a variety of tastes. I had some chicken tortilla soup, a chunk of parmesan with parma ham (?) and good brown bread, grilled veggie salad, macaroni salad, scallop ceviche, gnocchi with peas and pancetta, pulled pork on a piece of cornbread with coleslaw(pork was too sweet for my taste), a tri tip slider (too fatty), some kind of fish with tomatoes, Thai beef salad (wasn't good at all, flavors weren't there and beef was tough), and bbq pork char siu bao. Desserts included lemon tart (awesome of course!), some kind of chocolate and banana thing that was pretty good too, chocolate dream tart ? (was soooooo gooood, great mix of something crunchy on the bottom, creamy chocolate mousse? ganache? with a candied hazelnut - YUM. So maybe I had too much chocolate, but that chocolate mousse or pudding in that tiny cup wasn't too interesting.

Bouchon. Amazing, definitely amazing. And interestingly enough, we found this place when we were on our way to get our tickets for Phantom: The Las Vegas Spectacular. Which is an A-M-A-Z-I-N-G show, if you are in Vegas, you NEED to go see it!! Get same day half price tickets through Tix4Tonight! I heard of Bouchon while I was still in NorCal, I came across it when I researching for places to go to in SF. Sadly their Northern California location was too out of the way for us. It's in Yountville (a city I never heard of until I came across Bouchon) near Napa. So I only have the pictures of the macarons that we bought because we saved those for last. Other goodies we bought and inhaled included their famous chocolate bouchon (kind of like a brownie), almond financier, pain au chocolat, chocolate and almond croissant, and raspberry jam filled beignets. Everything was amazing, I only wish I could have sampled every single thing there!! However, the lemon macaron was too sweet, raspberry and chocolate macarons were amazing!


Raspberry Macaron.


Lemon Macaron.


Chocolate Macaron.

And so the last place I have to review is Stripburger. I ordered some tomato gazpacho, a classic hamburger with garlic fries and a Sunburn Sangria. The burger and fries were perfect. The sangria wasn't actually a sangria, it didn't have any wine. It tasted like strawberry Torani mixed with vodka and lime soda.

As if this post wasn't long enough already, I need to mention that I saw Julie & Julia this past Friday...along with a bunch of other foodies of course! I loved it! I'll probably be looking into getting my hands on the dvd! That movie is sooooo drool worthy!! I was starving by the end...or just really wanting some French food. I have never wanted to cook French food so much as I do now, especially Boeuf Bourguignon!! But I don't have a Dutch Oven...and I really want to use Julia Child's recipe! I know I'm going to buy one someday, but I'm saving up for a new computer right now, I know I want a Le Creuset, but I need money!! Haha...so does anyone have a recipe that doesn't require a Dutch Oven?!

My sister's wedding cake planning has gotten nowhere since I took a whole week off vacationing. But there a few recipes that I want to try out, but I might not get to that until later in the week since that's when she'll be dropping by. But yes, I'm still a little scared!

Monday, July 27, 2009

Help!


My sister is getting married next year...she asked me to make her wedding cake...to serve possibly 200+ people...Uhhh...

[cricket...cricket]

I said yes of course! She's my sister and I'll also be her Maid of Honor. But what am I getting myself into?! My cake decorating skills are horrible!! And all those people are going to see it!

Hmmm...maybe my sister will change her mind by then [crosses fingers and toes]. But then again it would be really special if I could make her wedding cake. I have no professional baking background or even wedding cake skills, so I need as many tips as I can. AHHHH!!! How am I supposed to even put a wedding cake together? I know I need dowels, but that's about it.

So I've been pretty busy lately helping my sister with wedding planning stuff. It's fun, but boy, it sure is time consuming! Looking at wedding dresses, bridesmaids dresses, shoes, wedding favors, invitations, ties for the groomsmen, flowers, and a million other things. So does anyone have any tips on making a wedding cake?

I guess I'll be sharing my fruit tarts with all of y'all today. I love fruit tarts. I made these for my graduation party last week. One of my favorite places to go is Porto's Bakery here in SoCal. I was pretty satisfied with my results, since I never made them before, and my sister's fiance said it tasted like a a fruit tart from Porto's. Awesome!

And I've got to hand it to Dorie, she knows what she's doing. I used the sweet tart dough and pastry cream recipe from her book that I got for six dollars! I made a few small ones, that were the same size as those lime tarts, and I made an eleven inch one. To decorate I used: peaches, strawberries, cherries (that I pitted myself using a straw), apricots, and nectarines. To make them shiny I heated up some peach jelly with a little bit of water. Enjoy!


Unglazed and then glazed.


Looks pretty professional to me :)

I've been snacking on these cute little Chocolate Yogurt Snack Cakes via Smitten Kitchen.

Friday, July 17, 2009

Lovely Luscious Lime Tart


Who doesn't love a citrus tart? Lemon. Lime. Lemon and Lime. They're all delicious. Sadly, I have to admit that the first lemon tart that I had was earlier this year. I bought it at the Davis Co-Op, which is a pretty interesting place to check out if you're in Davis. The tangy-ness of the tart surprised me at my first bite, but then I just couldn't stop. The curd was creamy, light, lemony, and the crust just complimented the tartness of the curd so well. I then bought a jar of lemon curd weeks after when I was making my lemon macarons. And then when I took my birthday trip to SF, I stopped by Miette's and got a lemon tart. Haha, I couldn't stop!! I even bought another one before I came home down south. So yes, I was hooked!


I started craving a citrus-y tart a while before I finally decided to make my Lime Tarts. But why did I choose lime over lemon (even though I never had a lime one before)? My parents have a lime tree, so I didn't have to go out and buy anything, we have A LOT of limes around the house! I also noticed that limes are definitely easier to squeeze the juice out of than lemons. So I had everything that I needed to make these really yummy yummy tarts! Of course I found about a dozen different recipes for lime curds and pastry doughs. But I settled on the lemon tart recipe by David Lebovitz and sweet tart crust from Smitten Kitchen that she adapted from Dorie Greenspan.

So I started by making the tart crust. The recipe is for a 9 inch tart but I have an11 inch tart pan and a bunch of smaller ones, about 4 inches. So I ended up with 5 small tarts and 3 baby ones, which you can see at the very bottom. I also don't have a large enough food processor to make the dough in, so I used a pastry cutter. And instead of chilling the dough and rolling it out, I pressed it into the tins. The tarts came out beautifully without shrinking! So just make sure your butter is cold and that you freeze the dough in the tin before you bake it. I kind of felt that my crust could have been more crumbly, I might have pushed in the dough too hard or something, but next time, I'm going to try replacing some of the flour with some ground almonds.


I'm not sure if my lime curd was too sour, I guess it depends on personal preferences, but I think it was a little too sour. I probably should have increased the amount of sugar in the recipe since the recipe was for lemons instead of limes. And I guess limes are more sour? Don't get me wrong though, they were still tasty! This was also my first time making a citrus curd, so I was really cautious about doing things right. The recipe is simple enough, my patience was just wearing thin since temperatures around here have been dancing around the 100's. I still can't believe I've been baking these past weeks since it's so hot! Long story short, I raised the heat a little over low, and probably cooked it too fast - so I kind of ended up with pieces of cooked egg. But I just strained them all out anyways, so my experience wasn't too bad...Thankfully :)

Wednesday, July 15, 2009

It's Gettin' Hot in/over Here!!


Driving from NorCal to SoCal. Pictures in this post were taken by my dad and some by me with his waaaaaay better camera than mine.

#1 reason not to move to SoCal: The wildfires because it's too darn hot, dry, and windy here during the summers. Since I've been here I think I've seen about 3 fires on the news so far...And I've only been here a little over a week!

Anyways, during the school year I never have time to read for fun. I'm almost done reading Julie and Julia by Julie Powell, it's a very entertaining read! It really is fun to see someone take on a challenge that big without going nuts. I don't how I'd ever be able to do that...especially when Julie came across the chapter of making gelatine...eeeks! I can't wait for the movie to come out. I love Amy Adams. And Meryl Streep is always amazing. Mmm...the foodie movie of the year!! It might actually want to make me try cooking French food. If only it were as simple as the foods I learned about in my French classes.

Yesterday, I also bought Dorie Greenspan's Baking from My Home to Yours, for $6!! I love finding bargains :) This will sound surprising, but, well, I never heard of her until I plunged into the world of food blogs. I can't decide which recipe to try first, there are SOOO many!! Have you seen how thick that book is? And I need to find people to eat what I make too!! My boyfriend isn't around to polish off the sweets and I need to lose some weight from my baking binge that happened at the end of the school year.

And to go completely off topic, I just wanted to share some pictures from my trip to Santa Cruz and a Farmers Market we came across.

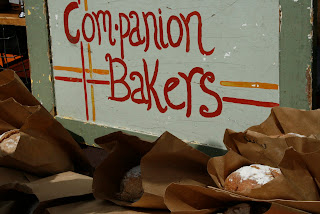
Me and my dad had some delicious baked goods at this stand, too bad we didn't try buying some of that mighty tasty looking bread.

My dad's choice.

And mine...

Yum!

<3